

THE BLOG

Tiny Tidy: Your Home's Landing Strip Area
Where you come home from a long, hard day, there is GREAT temptation to just toss your stuff any old place, crack open a bottle of wine and put your feet up…But what if you could get to the fun part after you quickly get organized for the next day? That’s what a perfectly functioning Landing Strip in your home should do for you (and your family): Get you good & ready for the next day’s activities/work. So! With those thoughts in mind, let’s get to it…!
Where you come home from a long, hard day, there is GREAT temptation to just toss your stuff any old place, crack open a bottle of wine and put your feet up…But what if you could get to the fun part after you quickly get organized for the next day? That’s what a perfectly functioning Landing Strip in your home should do for you (and your family): Get you good & ready for the next day’s activities/work.
So! With those thoughts in mind, let’s get to it!
Do you have a Landing Strip in your home, a spot where you and/or your family plunks everything down? This could be a bench near the front door, a shelf, an alcove with a shallow table, a space that’s unobtrusive yet works for this purpose. (You can also identify part of something else in your home for this purpose-for me, it’s part of my kitchen table and a nearby chair.)
Once you have identified where it is, take a good, hard look: Does it make you feel … well..anxious? Or does it make you feel calm and okay? (We want to go for calm and okay!) If it does NOT make you feel good, try to identify where and how you could change it.
If you have it, but it needs some changing, make a small list, or see if you have any items at hand that could make it function better: For example, do you have some hooks you could place over the bench for the kid’s jackets and backpacks? Or a few large, pretty baskets to toss shoes into? Try to re-purpose what’s around your house for this Tiny Tidy, and see what you can find…
If you don’t need to change it, but want to, try to see where you naturally gravitate towards when you arrive home. If it’s your bedroom, maybe your Landing Strip is a chair where you can place your bag and computer easily at hand, and can set-up a charging station for your devices near there, too. If you have a large family, maybe you can march everyone into the laundry room, and use a part of that space to keep clutter at a minimum, or clean out a hall closet to stash backpacks, shoes, and sports bags for their other, random stuff. Make it a ritual with the kiddos, and make them responsible for their own stuff from now on! No more running to the car to get their homework, etc. (They will thank you later for this, believe me!)
If you have a Landing Strip area that you like to use, then see if you can make it better: I love the Marie Kondo of putting her day bag in a drawer, so it’s out of site, and she does this as soon as she walks in the door. Maybe your Landing Strip area is in a few spots: You can maybe try stashing everything in a closet when you arrive home, and just have a charging station for your laptop and phone that’s equally out of the way, but convenient.
Try setting up a mail processing space in the Landing Strip area, too: I know this sounds ridiculous, because so few of use get tons of mail anymore, but make it a habit to keep any bills or parking tickets that are not automated and still arrive via the mail nearby, and RECYCLE everything and anything you don’t need IMMEDIATELY! As you know , a few days of junk mail build-up and make it seem like you have heaps of mail to go through. You don’t. And you won’t, if you recycle it all right away…!
De-clutter anything that really doesn’t belong there, including above-said old mail, invites, fliers for expired events, whatever else you have hanging around there
Enjoy your new, clutter-free Landing Strip area-you are DONE! xo
Check out these sleek, chic & so cute bamboo baskets from my friends at Target:


How to Complete a Major Fall Organizing Project (And NOT lose it!)
I had to help my brother, who has a two-car garage, organize some big storage items, work things, old furniture, holiday decorations, you name it, that had recently landed and accrued space in his garage. The pile was only getting worse as the months went by, and since he was going out of town last week, I offered to help…Ugh.
I had to help my brother organize some pretty big storage items: Work things, old furniture and baby things, holiday decorations, you name it, that had recently landed and accrued space in his garage. The pile was only getting worse as the months went by, and since he was going out of town last week, I offered to help…Ugh.
Fall can be, I usually find, a really great time to start anything anew.
And I find it to be an especially good time to rid yourself of the past in any way you choose, or feel the need to fulfill. Something like clearing and cleaning out a garage, or any storage unit or closet, is more monumental, and emotionally taxing, than one things, especially if there things and family mementos from random, multiple moves, as was the case here. (I even had a box of old photos I was missing stashed here! More on that later.)
Since I had no less than three melt-downs, and several bottles of white wine last week to ease my pain, I wanted to save you from some of it, and illustrate a good way to move through, and into, your stuff when overhauling a large space-like a garage or storage unit.
Here we go…
Walk around. Do not lose it. You are only looking. I know, I know. You try to pick up one small box, and it is simply filled with another, smaller box of random sh*t. It is mis-marked, disorganized and out-of-control, perhaps. I feel your pain. But, for now-simply walk the space, and start making a mental (or physical, paper) note about what you want to toss, give away, or sell.
And here, I’m talking about: Any used furniture you no longer want, electronics like printers, old bikes, baby stuff-such as toys and cribs, and old athletic or gym equipment.
Call the Salvation Army to pick up the items for give away. They will take anything they can truly resell, except for baby items. You may have to wait a few weeks for an appointment, but it’s less expensive than renting a truck or van to do this. If you have mainly smaller items and clothing here is a link to finding a Goodwill drop-off bin in your area
That charity pick-up day will be your start day.
Get at least one friend or family to help, if you possible can. It helps tremendously. My niece and her best friend are remarkable organizers, when they have a task in front of them. Get a teen or even older kid to help you out, man!
On the first day or afternoon or morning you have blocked out to start this crazy task, pull out the above items-making sure that the give away items are the most accessible for the Salvation Army truck that’s (thankfully!) coming.
Next, pull out the above items that you would like to post on Craigslist or Ebay to sell. Take some quick, not-too-terrible photos, and mark down the brand names and dimensions, This will give you some good energy to start.
You will be posting those items to sell tonight.
Look around at what is left in the actual space. Make sure you have your fave coffee, tea or feel-good beverage of choice.
What are the four or five main categories? Consider: Work Stuff/Holiday Decorations/Craft and Creative Supplies/Photos and old albums/Momentos and kid’s art/old documents & important papers.
Start sweeping out the floor and little nooks and crannies as you go. This will relax you, and make you feel at least little bit more calm, if this entire process drives you completely nuts, as it does me.
Start lugging boxes to their respective places and corners. This is going to take awhile. Trust me. Because you will find stuff within stuff within stuff. That is okay. We are not going deep now, just putting things in organized categories and spaces.
Keep going. Some boxes and containers will be mis-marked, or unmarked. Them’s the breaks.
Please, once again. Do NOT start really going through stuff now, or get kneeling on the ground, shuffling through some old, decrepit photos. NO! This will only give you a nervous breakdown, and make you very exhausted. (Ahem!)
Take a good break, and wait for the Salvation Army guys to arrive.
After that arrive, yay, you have even more space now! Pat on back. Good! Get back to work now, though.
Sweep the floor some more.
Put any random bits and bobs in the garbage and/or recycling containers. You may have to make several “off-site” trips to a local recycling bin, I myself made about five (!)
I say start with the documents. If you have anything that can be shredded, there are community shredding events in your city that are free, or you can have about 14 boxes shredded for about $100 0f they come to you, depending on which service you can find. Tax returns you should keep for up to 7 years. If you have gone paperless for bank and credit card statements, consider shredding the paper docs older than a year. Let’s rid of this crap, if we can, and today!
Start looking in these work and document boxes to see what’s what. Important papers, like social security cards, birth certificates, and wills, should probably be kept safely inside, in an accordion file, or locked box, whichever you prefer.
Put the file boxes or bags of paper to be shredded aside. Way aside, in a cozy corner, or better yet, a side yard.
Look at what is left. You may find you are already starting to have quite a few extra containers on your hands. If they are in good condition, and you want to keep them, wipe them down and stack them all up to utilize later.
Stack all the work/doc boxes in their respective space.
Go on to something more fun, such as holiday decor or craft supplies.
Go one box/bag at a time. Do you want this?? BE RUTHLESS. You can know make a pile to BRING to Goodwill or Salvation Army, yourself.
You may find yourself with pricey craft stuff moldering in a marked holiday box, or important papers stuck in the bottom of a box of photo albums. Just take a deep breath, then sort it out, and move on. I know it sucks. Believe me! I know.
When you finish with a category, keep paring each section down, further and further, make sure to put all the boxes of that category back in their new space, before you move on to the next category of stuff.
You may think you are done, so, go and take a shower, and go and relax, if you can, for awhile.
Post the stuff to sell on Craigslist or Ebay. Ahhh…
You are NOT done, though!
Schedule the next day or evening when you can “hit” the garage our storage space.
Repeat the steps of going through each newly sorted box in each category, or at least, do a very ruthless scan. Is there anything else that can really “go,” or be sold, at least? Do yourself this favor. Try, try, try to let it go, if you can.
You may now find that you may need several more hours of work to finish really organizing, but believe me, you have already complete dates majority of a giant task. Good for you!
And note how you feel. Do you feel “done?” Really pay attention to that satisfied “click,” or the lack of it. You will really know when you are done.
Phew! Go bring that extra stuff to Goodwill, and put in a corner the stuff you are selling.
Woo-hoo! Go have a nice glass of wine or sparkling water.
YOU DID IT! xo #yourule
(And I will be posting, hopefully, a nice “after” next week!)

“Before…” #oy

Tiny Tidy: Your Linen Closet!
This is either quite a tragic task for you, or very easy, depending on how many people are using the linen closet, how many family members you have, and how large your home is, bedroom & bathroom-wise. Get ready to turn some old sheets and towels into something more useful, and let’s get BUSY…
This is either quite a tragic task for you, or very easy, depending on how many people are using the linen closet, how many family members you have, and how large your home is, bedroom & bathroom-wise. Get ready to turn some old sheets and towels into something more useful, and let’s get BUSY…
Things you will need:
A nice microfiber cloth and your fave natural cleanser, and a garbage bag and a cloth tote
Take a look at the linen closet. Closely.
Put a towel or sheet on top of a nearby bed.
Take everything out, and place on the bed.
Wipe down the inside and outside of your linen cabinet or closet with your cleanser and cloth.
Go and take a good, hard look at what’s on the bed.
Pick out any old or really mismatched sheets and towels…(Do you still have twin sheet sets from when your kids were little, or even from college? Ugly, patterned towels you have always really, well, hated?)
Are there any you can use for drop cloths, car wash towels or rags? If so, place in cloth tote bag.
If anything is really bad, you can also choose to toss in garbage bag. (But try not to do so, if they can, in fact, be reclaimed.)
Fold everything you are keeping back up as nicely as possible.
Figure out if you want to switch up the way yo had things before, or not: I like to put table cloths in back of the shelf I have my sheet sets on, and the towels below them.
I also like to store folded, little washcloths and for-delicates dryer bags in a small, wicker box. It looks super cute, and keeps them from toppling over.
Lean back, and admire your work! You are DONE!
Good job! xo


TINY TIDY: Pick A Drawer, ANY Drawer...
I just want to state again that the entire concept of these little Tiny Tidys, and the "Home" aspect of House & Mind, is to allow for the realization that not only is the idea of perfection not desirable, it's not even an option. It simply doesn't EXIST. (Phew!)…
I just want to state again that the entire concept of these little Tiny Tidys, and the "Home" aspect of House & Mind, is to allow for the realization that not only is the idea of perfection not desirable, it's not even an option. It simply doesn't EXIST. (Phew!) By keeping your home clean and organized at YOUR level and your own pace, you will find your life to become endlessly more satisfying and just...feeling a bit more together. It's really true! I promise. If you are happy with things a little messier, and it keeps your life and more richer and more creative, keep it that way! If it's messy, and your life is out of hand, and you feel perennially on the run, chasing after things and out-of- control, maybe start a little slower, but take a stab at cleaning things up. That is what these TINY TIDYS are for, and with THAT in mind-I'd like you now to...Pick a drawer in your bedroom, kid's room kitchen or bathroom...ANY drawer!
Get READY...
Gather up: A rag and your fave natural cleanser.
Place a towel on your bed or nearby counter.
Find & gather up the bottom of some smaller, empty boxes-think iPhone old boxes, shoe boxes, stationary boxes, so you have some different width, depth and length options.
Walk around your home, and figure out which drawer you are going to focus on. Do NOT over think this, please! I mean it! Just pick ONE drawer.
Once you have figured it out, take everything OUT of the drawer (just do it!) and put it on the towel-covered bed, or counter-top.
Spritz the drawer lightly with cleanser, and dust it off/clean the drawer off.
When you are done physically cleaning the drawer, turn and look at your stuff you have place on the counter...
It's probably a jumbled mess. That is okay!
Basically-THIS part is the "real" juicy part of this process-NOT how you are going to reorganize all of this crap. I know your throat may be clenching up and your heart could be racing-what with looking at what could possibly be a real mess. But it's alright. Take it easy.
If this is a junk drawer you are doing, start tossing! Recycle or put in the give-away bag ANY old cords or random things hanging around...Just be ruthless. The stuff has been sitting in there, most likely, forever.
If you are doing, say, a lingerie drawer, inspect each and every article of clothing. Get rid of or put in a give away bag ANY thing you do not like, looks worn to you, or somehow, gives you the shivers. Do this quickly.
Depending on if you have clothing, accessories or junk drawer items. start looking at your new organizing system-those boxes and lids! Place some in the empty drawer. Start putting things back in the boxes, in a way that you'd really like them to be from now on. Play around with them. The lids are excellent to use for this, and act as little trays. I use them EVERYWHERE. They organize toiletries and junk drawer things really beautifully.
Futz around until you feel that "click," and get the drawer the way you like it.
YAY! LOOK at how easy that was- Congrats! You just tidied a random drawer in no time! #itsthelittlethings :)
These boxes and lids have been my main take away from that whole Kondo-craze- the lovely idea that you do NOT spend more money on more stuff to organize, just use the stuff you have!
I really do love that. If you feel like it, KEEP going! (Ha! My little strategy today, to be honest.)
And have a great weekend! xo

Capture that "Back-To-School" Feeling! (Even if you are over-worked, stressed, need a vacation, and broke!)
YES! It's that time of year again...The kids are going off to school, maybe even college...You may already feel completely overworked and scattered and stressed, trying to get the shopping, arrangements, papers ready for the title (or big) ones…
YES! It's that time of year again...The kids are going off to school, maybe even college...You may already feel completely overworked and scattered and stressed, trying to get the shopping, arrangements, papers ready for the title (or big) ones. Maybe you don't have kids, but you're in great need of a little mental break, treat, or just something fun to look forward to...If either (or both!) cases are you, then please take this opprtunity, while taking some time out to start doing your Un-Plan for Fall, to think about and tune into that "Back-to-Feeling" from when you were young (sigh!):
Get very comfortable, in a safe and relaxing space.
Close your eyes...Calm and quiet your mind, as best you can...
Try and remember the smells and feelings of that time...
What comes up for you? Dread? Excitement? Thrilling-ness? Anxiety? It's important to note this...
If the feeling leans more toward the negative, please don't get lost in this story. Breathe deeply, veer away from it, and try to hone in on any feelings that you can recall that were full of some kind of positive anticipation about this time of year...(Some of us may have to go quite far back! ;)
Any positive memories you can bring up? What made them so great? Was it the people around you at the time? Was it what you were looking forward to? Perhaps, it was just the fact you had a lovely new outfit that your mom or dad or grandparent had let you pick out on your own...? Whatever it was (and perhaps there are more than one memory) hold it close to you in your heart: Does it bring up a feeling of longing? Desire? Fondness?
If it does, you hit a sort of paydirt! That is gold! Because, even if the people around you are, well, no longer around, you can give yourself a dose of what you need to get that delicious Back-to-School feeling...back!
If you miss having specific family around, maybe start a ritual of calling your cousins, parents, aunts, grandparents (whoever you'd like) once a week during the Fall. Are they mostly all nightmares? ;) Then get on Facebook, and hit up some old pals from grade school or high school. YOU have changed, but an essential core of you is still quite the same, believe me. Chances are, you can tap right back into that while chatting or corresponding with someone who knew you, way back when...:)
If it's the "new-ness" of everything that you really crave, that fun feeling of having new clothing, sneakers, shoes, and school supplies, then find a way that is within your budget to purchase or procure a "set" of something or an outfit that is completely new. This can be office supplies from the Dollar Store, or a new outfit from Poshmark (my ultimate and fave place to both new and slightly used clothing, shoes and accessories-just use my code SHOPFRAN to get $5 off your first purchase!) Maybe you're more into design, and would love to get something new for your home?
Either way, maybe Fall is the time of year to make a big deal out of YOU!
Whether you are an MBA, or didn't have the opportunity to graduate high school- no matter at all. Fall is a GREAT time to take some time for yourself, connect with old friends and loved ones, and give yourself, or your home, a little gift.
YOU DESERVE IT. xo
Tiny Tidy: Your Bookshelves!
This one takes a bit more concentration than most other Tiny Tidys, but its well worth it! You can still do this even if you have adapted to mostly using a Kindle, and your bookcases are used to mostly house knick-knacks, plants and the like.
PICK ONE BOOKCASE/SET OF SHELVES YOU'D LIKE TO TIDY THE MOST, AND LET'S GET TO IT!
(GATHER A FEW EMPTY SHOPPING BAGS, SOME RAGS AND YOUR FAVE ALL-PURPOSE CLEANSER:)
- TAKE A GOOOD LOOK! What do you NOT like about your current bookshelf organization? Are the shelves too crammed, too minimalist, or simply not being used properly? Do you have just loads of books you have not yet read, and, if you're honest, have no real intention of doing so? Take note of how you want the bookcase to look and feel...
- TAKE EVERYTHING OFF OF THE SHELVES.
- Wipe down the shelves, top and bottom.
- Start with the books. This is where we DO totally follow the Kondo method: Pick up/look at each book: Do you REALLY love it? If you've read it, would you like to keep it to re-read, or pass on to someone else? Decide now!
- Place in a pile in your shopping bags the books that are NOT staying.
- Look at the ones that are staying, and think about how you'd like to organize them.
- I like to start with a shelf of books that are old favorites, another filled with new ones, then one for biographies, memoirs, self-help or psyche books, and on and on. Dust these off lightly, and...
- Arrange the books you are keeping as you have decided.
- Fill in with any knick-knacks, plants or photos that you'd like, dusting off the knick-knacks and frames lightly as you do so...
- Take this time to decide if there are any little knick-knacks or photos that could be added/taken away, etc.
- Now, you are almost done. Those books you are giving away: Who would like them? I personally almost monthly give books away (and take some, too!) from my local Little Free Library, which are run by neighbors, and are beyond adorable, useful and amazing. Make a point to put those books in your car, to drop off to friends, your regular or Little Library.
- And...Dude , good job, you are DONE!
NOT SO BAD, right?! Now, you can start on another one, you bad-ass, if you really feel like it, have more than one! #yay! xo
Tiny Tidy: Your Fridge (Ugh!)
I know, this one is not so "tiny." In fact, the electricity went out in my apartment for about six hours when I wasn't home this week. I literally had to throw practically everything went, as, I found out the hard way, a few things spoiled! Ick.
(It's a pain to do this one. I totally get it.)
But! Summer is sadly, soon, coming to an end. You have had probably had more fresh fruit and produce in the fridge than usual. Now is a great time to get rid of these old left-overs, condiments that have seen better days, and, well, YOU know! All that good (and gross!) fridge stuff. You CAN do this in 45 minutes or less. It's just going to take a little bit of planning…
I know, this one is not so "tiny." In fact, the electricity went out in my apartment for about six hours when I wasn't home this week. I literally had to throw practically everything went, as, I found out the hard way, a few things spoiled! Ick.
(It's a pain to do this one. I totally get it.)
But! Summer is sadly, soon, coming to an end. You have had probably had more fresh fruit and produce in the fridge than usual. Now is a great time to get rid of these old left-overs, condiments that have seen better days, and, well, YOU know! All that good (and gross!) fridge stuff. You CAN do this in 45 minutes or less. It's just going to take a little bit of planning:
So, let's GO! (get excited):
Plan on tossing and cleaning out food items and produce that are old, expired and, well, just done and over. You will want to rinse and keep, or rinse and recycle (please) plastic containers and glass jars, if at all possible. Have a recycle bag ready and waiting, and please make sure your sink is clean and ready. We will be dumping the old stuff and containers and expired condiments in there, first!
Start by getting: A sponge (or even better-Magic Eraser) your favorite natural cleanser, a rag, a bag for recycling containers, and a little note pad and pen.
Okay. Get ready! Open up that fridge.
Take a look in there. What is going ON, honestly? Take a really good look.
Now, start going through the obvious first-the shelves that are in view.
Go shelf buy shelf.
Put the "keep" items on the counter.
Place what you are tossing in the sink, just for now.
Now, you can choose to either wipe down the shelves as you go, using your sponge or Magic Eraser for the really gunge-y parts, or wait and wipe down all at once. Your choice!
Now-hit the side door shelves-the egg and butter compartments. Be thorough.
LOOK at those condiments. If the date has been scratched off check them out, but my guess is, they may have to go. Things like Apple Cider Vinegar, however, which I like to keep in the fridge. Just use your best judgement. (And your nose. ;)
Start making a list of what you want/need to replace, or even add. Here a few, healthy swap-out ideas: Coconut Aminos (you can buy at Trader Joe's.) in place of soy sauce. Plain Greek yogurt instead of sour cream; Any "organic" varieties of things like ketchup, jam and almond or peanut butter are just great. (Trader Joe's also has some wonderful and expensive options. Often their organic products are cheaper than "regular" items in a mainstream grocery store.) We are not an affiliate of TJs, by the way! Just enormous fans.
Okay. NOW-hit the veggie and fruit drawers. (I know. I feel you. Believe me.)
Throw the produce up on the counter.
Take a look. Can you cook/freeze/prepare any of it that is about to spoil? Plan on doing so now. You can throw veggies that are about to turn in an omelette or frittatas, make a quick salad. or even compose a strangely delicious new smoothie combination.
OKay! Hit those drawers. Pull them out real quick. Clean them as best you can. (You can do this!) I know, it's almost the worst. Just do it, though! You will feel lots better when it is DONE.
Now, take a break. (Just for a minute, though.)
Wipe down anything little spots you missed. (They are there!)
Now, look at the stuff on the counter. Start starting/tossing/recycling "old" food and condiments you have placed in the sink. Clean out the containers if you can-to clean and save, or to recycle. It is SO tempting to be lazy and skip this step. DON'T DO THAT.
Put everything back- all the food items, produce, condiments-that you plan on keeping.
Extra points if you want throw the lunch meat in an open plastic container to organize it better, or arrange the healthy foods shelf by shelf, so they are more accessible. You can be as cute as want. Roommates and family member swill have to deal. YOU CLEANED IT OUT! So there. Take that, bossy whoever.
AND YAY! YOU JUST CLEANED OUT YOUR FRIDGE! Now-it's time for a little treat! Whatever that means to you...Or, you can choose to cook a nice meal for yourself, your sweetie or your kids, with what you didn't know was still good, fresh and lurking in that fridge of yours...
Have a good one! xo
TINY TIDY : Your Cell Phone!
Have you ever scrolled through your contacts in your cell phone, and your heart absolutely lurches, because you forgot to delete the number of the guy who ghosted you five years ago (or vice versa!) or it pricks up and races when you see the number for that tutor you never called for your kid's advanced math class!? Today, we are getting rid of all that shame, stress and blah-ness that comes from looking at a device that may be filled with contacts and apps that do not express or reflect the good and juicy and interesting life you are living right now...
This is a "Digital Version!" (Special thanks to Mick Kubiak for this great idea!)
Have you ever scrolled through your contacts, and your heart lurches, because you forgot to delete the number of the guy who ghosted you five years ago (or vice-versa!) or it pricks up and races when you see the number for that tutor you never called for your kid's advanced math class!? Today, we are getting rid of all that shame, stress and blah-ness that comes from looking at a device that may be filled with contacts and apps that do not express or reflect the good and juicy and interesting life you are living right now...
GRAB YOUR PHONE or IPAD, and LET'S GET GOING!
- Find a quiet, relatively stress-free one in which to do this, and promise yourself a little treat afterwards! Grab a sheet of paper and pen to make a small to-do list, coming straight from contacts you forgot to hit back. (Literally, just “Call the new neighbor Joan to set-up playdate.” Easy! BUT: This can be a teensy bit emotionally taxing, strangely yet also, very understandable. So go slow and do take it easy.
- Start with the A's. Start scrolling. If you're like me, you have contacts from different life periods, projects, volunteer gigs and various jobs. Be careful, but then, start hitting DELETE, DELETE, DELETE!
- When you are done, take a small, little break. Then, start skimming, again! I guarantee it, you missed a bunch before.
- Jot down anyone you have to reach out to, but have been neglecting for a minute. (Even if "a minute" is, in actuality, six months, or maybe even more!)
- MERGE any multiple contacts and emails, as well.
- Now…on to the Apps!
- Open phone or iPad or Tablet up to your Home Screen.
- DELETE any App that: You Never Use, Does Not Serve Your Life Right Now, and/or Is a MAJOR Time-Sucker (G'bye, Candy Crush!)
- GO TO THE PODCAST APP, and start downloading some NEW podcasts to replace those time-sucking apps. Podcasts I love: The Lively Show, Optimal Living Daily, Happier, and, full-disclosure, My Favorite Murder (I just love those girls! Warning: The subject matter is intense, but they are hilarious.)
- Start contacting a few of those people on your list who you really do need to get back to, if you want, or schedule a time in your week to do just that.
- YOU ARE DONE! NOW…GO and TREAT YOURSELF!
#youdeserveitalways xo
Tiny Tidy: Your First-Aid Stuff!
This is an EASY-peasy one, and also allows you a guilt-free excuse to go to/shop at Target! (Yes!) GO to the space/place/drawer/cabinet in your home where you keep things like: Antibiotic ointments, band-aids, anti-itch creams, summer bug spray, as well as products like cough syrup, cold and flu medicine, Tylenol, and the like…
This is an EASY-peasy one, and also allows you a guilt-free excuse to go to/shop at Target! (Yes!)
GO to the space/place/drawer/cabinet in your home where you keep things like: Antibiotic ointments, band-aids, anti-itch creams, summer bug spray, as well as products like cough syrup, cold and flu medicine, Tylenol, and the like.
TIP: Get this stuff the heck out of your medicine cabinet, if it's in there, taking up precious real-estate, and move it! It is life-changing, believe me...To steal a great tip from Marie Kondo, even a clean shoe box or two works great for this type of storage, or if you feel like it, get some nice small plastic bins or pretty baskets on your next Target jaunt. Being able to see everything, easily and sort of all at once, and making it accessible when you are injured and/or sick, is the key, here...
- Sort items into two piles: First aid stuff first, and then, the other one is anything vaguely "medicine" related.
- Go through it!
- Check outage expiration dates. Toss, toss, toss. Especially the expired, old ointments. (You want those to really work!)
- Start making a list of what you need to replace.
- Put back what you are keeping, right back in place in its new home.
Now: Here is a List to Take to Target, or order online, below:
HOME FIRST-AID LIST:
- Antibiotic Ointment
- Band-Aids
- Anti-Itch Cream
- Cold Packs/Hot Packs
- Cough Syrup
- Cough Drops
- TUMS (why not? ;)
- Tylenol or Advil
- Cold medicine (Boiron's Oscillococcinum is amazing if you're feel flu-ish, and is 100% homeopathic. It actually works, too!)
- Allergy medicine (if you are prone, but it never hurts to have on-hand, especially you have a pet, and someone visiting is allergic to Fluffy or Fido!)
- You can also get crazy with gauze, if you like, but getting to the Urgent Care is probably a better bet if you or someone at your home gets accidentally sliced. But why not have a roll on hand, if it makes you feel better?
- Fabric wrap for tendon injury (Again, seek professional help, but...? Maybe for little runner's or work-out injury, nice to have around, just in case.)
- Aloe Vera Gel (Lifesaver in the summer months, no matter HOW careful you think you are in the sun.)
- Pepto Bismol, or something similar. (Because we ALL have those nights)
- Anything else you'd like to add!
That is it, and you are DONE! (And I rarely say this, but-Happy Shopping!) xo
Tiny Tidy: Your Everyday Bag/Purse!
This, admittedly, will be easy for some of us-and absolute hell for others. Choose which bag you'd like to conquer today- your tote bag for work, your everyday purse, your computer bag-whichever functions as your go-to, everyday-type-of-situation bag…
This, admittedly, will be easy for some of us-and absolute hell for others. Choose which bag you'd like to conquer today- your tote bag for work, your everyday purse, your computer bag-whichever functions as your go-to, everyday-type-of-situation bag.
OKAY! HERE WE GO!
- Grab your bag.
- Go and sit somewhere comfortably that also has some nice space to spread out the goods-maybe the couch near a coffee table, or your kitchen table (if the table is clear enough!)
- Open that bag.
- Peer in!
- What is your first feeling? Alarm? Distress? Anxiety at the twisted receipts and ratty hair ties lying at the bottom? Or maybe-calm, soothed and relaxed? (you little bitch! ;)
- Yes, you truly want to go for that feeling of being calm and organized every time you glance in there. Your money, phone, keys, planner, maybe your iPad or laptop- whatever you keep in there- it's... your life! This is important stuff. Pay attention to how you want to feel about these things, every single day. Focus.
- Take out your wallet/checkbook/where you stash your receipts (if you do that.)
- How do you feel? Anxious? Sort through your wallet-pulling out anything extraneous-slips/receipts/stubs, etc.
- DECIDE THIS: Sort it/stash it/trash it! Then do that!
- Put aside your wallet and checkbook, on the table.
- Pull out anything cosmetic-hand lotion, hand sanitizer, lip balm, make-up in a case. Go through it. Wipe it down with a damp paper towel or baby wipe.
- Put these cosmetics and similar items aside.
- Go through whatever the hell else is in there. Have a comb or hairbrush? Go rinse them out in the bathroom sink, and set them on the sill to dry.
- DECIDE THIS AGAIN: Sort it/stash it/trash- any junk YOU DO NOT NEED/USE EVERYDAY, or is basically nonessential.
- Put anything you essential you want to keep on the table.
- Grab a baby wipe or damp paper towel or rag, and clean that bag-inside & out! (NOTE: Empty out your bag in the sink first, before cleaning.)
- Look at everything you- ahem- set out on the table...Just relax. We will get through it.
- What would make you feel more "together," day-to-day? A new app on your phone? Maybe you are secretly analogue and old-school, and want to get a pretty, new Day-Planner? Perhaps it's some new lipstick, or (in my case) a way to keep a mini-version of your everyday make-up routine in your very small clutch. Whatever it is! Make a note of it, and try to make these purchases (or pull from your own home) this very week.
- Put everything BACK in your everyday bag/purse.
- Breathe sigh of great relief!
YOU DID IT! Great job...
The OG organizing tool, from Filofax...Grab it, below.
Tiny Tidy: Your Spice Cabinet!
Okay! Let's be honest, here: When was the last time you checked the dates on those spice jars and tins you have lurking (in maybe more than one place!) in your kitchen? That little bottle of ancient bay leaves you haven't used for ages? The three cans of Kosher Salt saved in the very back? C'mon! We are going to hit this baby, and hit it fast and easy…
Okay! Let's be honest, here: When was the last time you checked the dates on those spice jars and tins you have lurking (in maybe more than one place!) in your kitchen? That little bottle of ancient bay leaves you haven't used for ages? The three cans of Kosher Salt saved in the very back? C'mon! We are going to hit this baby, and hit it fast and easy…
Let's Get Started!
- Make some room on the counter, cabinet or drawer space near where you house your spice collection.
- Place a rag or dish towel over this space, and keep an extra, damp rag handy to wipe off any grimy/dusty jars.
- First, start taking out each little bottle, jar and/or tin of spices. Look at the expiration date (most actually have these, even though we think they last forever.)
- Separate what you are going to toss and recycle (container-wise.)
- Now, have a post-it note or small piece of paper handy. Pretend it is Thanksgiving, Passover, brunch day, date night- and you are cooking away, at YOUR house. What the hell did you forget? Thyme? Tumeric? That special salt rub you are famous for on that rib roast? Mark these babies down, if you realize you are out of 'em...
- Wipe off what you are keeping.
- I am NOT suggesting you (God forbid!) alphabetize your spices, but do yourself a favor here, and place back those spices you use the very least- in the way back of the drawer, cabinet or counter space where your spices live.
- Put everything back in, as you wish it to look.
- Dump all old spices out of bottles and tins; recycle their old containers (or take off labels to jars and wash them.) They are cute! You can save them for storage, or to keep fresh spices in the fridge.
- You are done! See that! EASY-peezy! Now, add any fun, new spices you wish to aquire (now is the time to think creatively of your future cooking plans!) to your grocery list! OR:
:))) Have a great weekend...xo
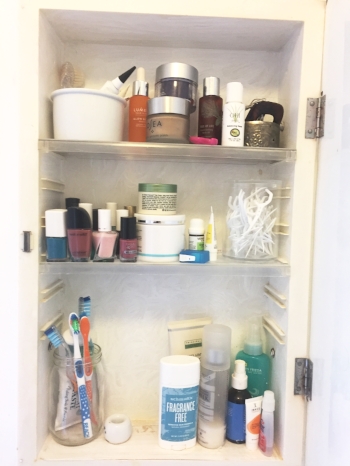
Tiny Tidy: Your Medicine Cabinet!
This one, for some reason, seems to strike a note of dread in many-but-much like the Make-Up Bag Tiny Tidy from last week, can actually, dare I say, be "fun." You can discover some new stuff that has been hiding, give away what you're not using, and make room and way for some new treats!
This one, for some reason, seems to strike a note of dread in many-but-much like the Make-Up Bag Tiny Tidy from last week, can actually, dare I say, be "fun." You can discover some new stuff that has been hiding, give away what you're not using, and make room and way for some new treats!
Now, full disclosure, I also have a few, roomy drawers under my linen closet- which I use to store first-aid stuff, extra medicine like cough syrup and the like, as well as spare make-up, hairbrushes and sewing supplies, as well as some extra toiletries. I do keep these pretty organized, and because of this fact-my medicine cabinet never really gets too out-of-control.
Okay, ready-or-not-here we GO!:
What You Need:
-Fave natural cleanser
-A rag or two
-New Con-Tact Paper (if you're feeling super ambitious) for the little shelves and sides and far "wall" of your medicine cabinet
WHAT TO DO:
- Make a clear, clean space, maybe lined with a towel, where you can literally dump everything into (or line your sink with a handtowel-and conveniently use that space.)
- Dump everything out!
- Wipe down the gunked-up shelves and inside of the medicine cabinet. Use the cleanser and Magic Eraser, and really get in there!
- Wipe down even more with the rags, even pulling out the little shelves, if you can.
- Look at all of the stuff you dumped out. Take a very CLOSE look.
- What is old/icky/expired? What?! Be ruthless. (You can do it.) Go through any meds, hair ties, lotions, potions, hair stuff, make-up in there- whatever it is!
- Separate the products and things that you are tossing or maybe giving away, if some things are still in good shape, but sadly unused. That's okay! Someone else will love & appreciate that Leave-In Hair Conditioner or fancy soap you never use, and has been just gathering dust and sitting in there for awhile.
- If extra ambitious-cut and use the new Con-Tact Paper here-on the shelves and/or interior of your medicine cabinet.
- Start carefully putting things back, but be strategic about it! Don't just toss the stuff back in.
- What do you reach for the very most, twice a day (or more???) Cleanser? Moisturizer? Toothbrush and toothpaste? Put what you use the most in the most accessible, easy-to-reach-for area of your medicine cabinet.
- Some More Tips: Keep the nail polish and serums and things you use on a more sporadic basis on your tippy-top shelves.
- Get creative-group like things with like, and then even group by color-just for fun!
- Make a little list of things you need and maybe WANT! Hey, a new nail polish can do wonders for both one's psych, peace of mind, and anxiety level. Especially when you open that cabinet, and feel a ray of soothing, calm organized sunshine, instead of getting hit by an errant bottle of nail polish remover!
Have a great weekend! xo
Restock the fun and affordable way, thorugh our friends at Target below:

Tiny Tidy: Your Make-Up Bag!
This one is pretty fun, I have to say, because you get to chuck all of the old stuff, and dream about some pretty new things to refresh that ole' make-up bag of yours...If you have a drawer/shelf AND a make-up bag, just pick one, or do both, if you're feeling extra-ambitious...
This one is pretty fun, I have to say, because you get to chuck all of the old stuff, and dream about some pretty new things to refresh that ole' make-up bag of yours...
If you have a drawer/shelf AND a make-up bag, just pick one, or do both, if you're feeling extra-ambitious today...Okay...GET ready to...
CLEAN OUT YOUR MAKE-UP BAG!
- Get a small bowl of warm, soapy water ready and some rags
- Lay some fresh rags down on the surface you want to use
- Get out your bag & dump everything out right now!
- Scan it, check things...
- TOSS: Mascara older than 3 months, according to the word on the street. Eye pencils that are worn down to nubs. Eye shadow that has change color from mixing with other colors (6 months if cream shadow) Lipstick & gloss-2 years, actually, if kept well! (In my book, depending on your wear of them...)
- Place your make-up brushes in the warm, soapy bowl of water, and RINSE GENTLY, and several times (until they rinse clean.) Blot with a clean wash cloth delicately. Lay brushes out to dry on windowsill, on top of a clean cloth.
- Wipe off what you're keeping, making a mental (or physical!) list of what you need/long for/want to add to your make-up bag, including sunscreen for the coming season.
- Put everything back in your bag, in drawer, on shelf. Feel better? No? Look and go through, and toss some more.
- Surprisingly, albeit in a smaller way, make-up can have that same hold some aspirational clothing purchases do: That expensive, crazy-red lipstick when you when out on a date with THAT guy, the sparkly green eye shadow for the Mardi Gras party...Give it to your niece or kid to play with, or toss it!
- Go and replenish & restock with some great (clean) beauty finds at:
(But only if necessary ;) Yay! You are DONE! xoxo

Spring Cleaning: Week Four-YOUR CLOSETS!
This is the last week of our Spring Cleaning Guide, so, rejoice! This last week can be either painful, or fun, or both, depending on how much of a hoarder you have bene this year. The key to thsi week? Start small! We're talking a hall closet or a few shelves of your linen closet, first. So, have a closet you have in mind that is the least terrible, and get ready to go!
This is the last week of our Spring Cleaning Guide, so, rejoice! This last week can be either painful, or fun, or both, depending on how much of a hoarder you have been this year. The key to this week? Start small! We're talking a hall closet, or a few shelves of your linen closet, first. So, have a closet you have in mind that is the least terrible, and get ready to go!
CLEAR OUT YOUR CLOSETS FOR SPRING!
What You'll Need:
A Can-Do Attitude (You can do this. You can!)
A few rags and your fave natural cleanser
Garbage bags/boxes
Let's grab a box or go, stand in front of the chosen closet, and GO:
Let's observe first. What is happening in there? Why are your kid's crafts stuff piled in the linen closet? Is it lack of creative space, or lack of creativity in your storage options? Be honest, here. Where can you put the stuff stashed in this closet that simply does not belong?
We will use for this example your hall closet:
Start pulling out what does NOT belong. You know what those things are! Just pull it all out for now. (Your heart may start racing. Do not worry. We will get to that stuff!)
Now look at that! Not perfect, but nice, right? Just maybe coats and boots in the coat closet.
Now, what bothers you, bumps out at you, makes the emotional viewing experience, well, unpleasant? Is it that horrendous and dreadful pile of gloves/hats/mittens on the very top shelve? Grab them. Go and get your prettiest, saved shopping bag from the one time you went to that fancy store and splurged. Put that mittens, hats, gloves in there. Push it back on top, or hang it on the inside of the door. The pretty bag will make you happy, remind you to treat yourself, and the winter stuff and accessories will still be very accessible, even more so now. (#Yay)
Go through what is left in there again. Look at all of those coats and jackets in your hall closet, for example. Consider this: If not used daily, could they perhaps go in the owner's own closet? Perhaps, right? Duh. Get all of those coats and blazers and things out of there that don't get used often.
And as your are repositioning those items, check them out? Do they still fit you/your partner/your kid? No? Put it in a convenient garbage bag to give to your friend or your fave charity.
Get more creative with what is left, and be a little bit ruthless. If you live in a city apartment, you may have a vacuum cleaner in there. That's okay. But can that damn ladder be stored in your super's closet, to be borrowed back when needed? (He/she might love to be able to use it, and, let's face it, it's a pain in the *ss to have a ladder in your coat closet!)
Put everything back. If you're too exhausted by some of the bigger things, and truly have no storage that you can think of to reposition them, do not despair. You did better than you think!
Go watch some Netflix and relax for a bit.
Ready again? Okay. Take a deep breath. It's time to...
Hit your bedroom closet! (I know)
Grab some fresh garbage bags.
Find another pretty shopping bag. This one stays in your closet, to use to put clothes you may want to sell, may want to keep-you are not sure.
I keep all seasons of clothing in my closet, mostly, but again, I live in LA. It's easier. (If you switch/store your seasonal clothing, you will be doing that after you clear.)
Here is where our dear friend Marie Kondo comes in very handy: Look at everything. What "bumps," makes you anxious, reminds of the worst date of your life? Like, truly, gives you some teensy (or major?) anxiety? IT GOES.
Do the above again. And again. And again! It doesn't matter the order. Do it with t-shirts. Pants. Jeans. Dresses. Skirts! What fits? Are you really going to alter that? I'm a fan of knowing that some pieces of clothing you love but never wear are actually waiting for the right time to blossom into your life. If you love it but don't wear it too much, for God's sake, just keep it, please.
Look at your shoes. Full disclosure: I am not shoe-obsessed. I know tat may be an anomaly. But seriously, it is my belief that most women have WAYYYY too many shoes. Go through these. Most are uglier than you think, trust me. GET. RID. OF. THEM. Separate them by season, if you have them lumped all together. Be ruthless. And guess what? I will allow you some guilt free shopping afterwards. Start your list of what you need with the shoes.
See how easy it was to dump those atrocious, old shoes when you knew you had permission to get some new ones/ Excited to finish this damn closet now? I thought so. Guess what? You can't buy any new clothes yet, okay? Just go through what you have decided NOT to give away now...
Spritz the walls of your closet with your rag and cleanser, give it a good rub-down.
Look at what's left. Really look. hang it all back up, refold your sweaters. Put it back in.
Look at what is remaining AGAIN.
What makes you feel less than? Fat? Anxious? If the amount of money you paid for an item you frankly hate is weighing on you, put it in the shopping bag to sell. (More on Poshmark later!)
But House & Mind, you may be asking: What if I am left with two pairs of jeans, three tops, and five sweaters? That's okay. You won't be, if you are reading this. Keep sifting.
Now, take a deep breath, and observe your handiwork.
Do you like what you see and feel? If not, keep going.
As you can see, this is not a matter of folding your sweatshirts correctly. Its' about what you have in your wardrobe, and what your wardrobe represents to YOU, that really matters here...
Take out your bags, purses, belts, scarves & whatever other accessories you have multiples of.
Do these same thing as with your shoes. Be more ruthless. Especially with those damm scarves! Go through. Go through. And go through again. Gift a nice bag you never wear to your mom/niece/best pal/fave barista. Put everything back. If you can be more creative this time, try it. Stack your least used purses in a basket, say, or the scarves now in a drawer.
Put back your seasonal clothing/switch it out now, and do the same thing with your summer stuff, above.
Look at your bedroom closet again.
Do you see now that what really matters is what is inside? xo Yay!
Repeat later on in the week with any kids' or guest room closets, etc.
YAY! You are done! (And you RULE!)
Repeat with any other closets you may have left. xo
Try to use what you have to organize. If you're done, and still need a little polishing, try ANY the goodies from our friends at Target:


Tiny Tidy: The Cutlery Drawer
Okay, this was one is easer than it seems, I think-even if you have bunch of sh*t in those (that?) drawer that does not belong! Get ready to clear out, wipe down, and get some quick tidying satisfaction!
Okay, this was one is easer than it seems, I think-even if you have bunch of sh*t in those (that?) drawer that does not belong! Get ready to clear out, wipe down, and get some quick tidying satisfaction!
What You Need:
- Two paper garbage bags-one for "give-aways/sell," one for trashed or unusable items
- A rag and your fave natural cleanser
- A place on the counter to put everything when you wipe out the drawers, and also, a place for things you will "re-position"
- A good "get rid of this thing!" mind set
Okay, ready? Here we go
- Take a good look at those drawers. Now, ask yourself: What is IN there? (Good question, right?)
- Toss, toss, toss! And by that, I mean, sure, put those ten bottle openers and wine stoppers from places like Margaritaville and your cousin's wedding fifteen years ago and your last trip to Cabo in the give-away bag. SAME THING with the cheap plastic "spiralizer" that honestly NEVER gets used (never worked?!) Say bye-bye to ANYTHING that does not make cooking, preparing or even nuking your food more fun and more delightful.
- Pull EVERYTHING else out, and place it on the counter.
- Decide where to put larger items or utensils that you like, but don't use often. For instance, if you only bake occasionally-put those whisks and baking utensils in a cute jar, and maybe store where you have your vases and other jars.
- Wipe down the insides of drawer with your rag and cleanser. Get in there good! (But don't take more than a few minutes to do this!) Unless you are a complete, raving slob, (JK!) a few minutes should do it.
- As the drawers dry to their pristine splendor, go through the stuff on the counter AGAIN, i.e.-what you haven't tossed! Look through it again! And again! C'mon! You can do it!
- Let's face it. Most of us are NOT Julia Child or Ina Garten. The most genius tool in my cutlery drawer is one of those silicone spoon/batter-stir long spoon things, which I implement when cooking just about EVERYTHING. It's seriously one of the only cooking tools I use. What do YOU use the most? Give away the utensils and cooking implements that make opening that drawer a real drag.
- Okay! Now! Put the "give-away" bag in your car. Right now. (Just do it!) Come back in.
- Put everything back. RESIST the urge to go out and buy some new organizing tools, unless you really need them. (See our suggestions, below.) But seriously ONLY if you really need them. (The clean tops of shoe boxes work great to separate things out.)
- Admire your work!

Do NOT think you need to be perfect-just get it done! xo
YOU ARE DONE! Yay! Congrats! xo
Some Fun Shopping To Try:

Tiny Tidy: Your Freezer (Brrr!)
As the seasons are beginning to turn, I bet you have LOTS of containers of frozen soup, winter stews and meats that may be way past their due date, or at the very least, need to be organized in there a bit better! This one is easy and fun, and not a full-scale commitment at all...
As the seasons are beginning to turn, I bet you have LOTS of containers of frozen soup, winter stews and meats that may be way past their due date, or at the very least, need to be organized in there a bit better! This one is easy and fun, and not a full-scale commitment at all (such as the ENTIRE fridge, which we will be addressing in this week's Spring Clean post).
For the Tiny Tidy Freezer Clean-Out....You'll need:
- A Magic Eraser or Microfiber Cloth
- Your fave natural cleanser (or a white vinegar and baking soda combo will work great here)
- Some labels or masking tape
- A Sharpie or a grease pencil
- Garbage bag for food you're tossing
Let's get to it!
- Get your trash bag ready.
- Start going through your frozen goods-things you have personally cooked prepared, stored and frozen. Put anything you want to defrost for meals this week in your fridge.
- Put the things you want to eventually toss in the sink to defrost (To be cleaned out from their containers and tossed a little bit later)
- Now toss any expired bags of frozen veggies, ice cream cartons, other foods, etc. which are past their prime.
- Figure out which foods stay in there.
- Take whatever is staying in-OUT. ALL of it-ice packs and ice cube trays, all boxes and containers of food stuffs-OUT-on a nearby kitchen counter.
- As quickly as you can, WIPE DOWN the entire inside of the freezer, using your cleanser of the baking soda/vinegar combo. If there are any frozen bits, nudge them out with a butter knife.
- WIPE INSIDE OF FREEZER DOWN AGAIN, this time, with a dry cloth.
- Put all the food stuffs and containers back, labeling anything you want/need to more specifically.
- When things in sink have defrosted, toss out the insides and clean out or recycle the containers.
YAY! You did it! And please remember, Tiny Tidys are not about Martha Stewart perfection! They are about remembering how easy and and simple it is to keep your space clean and organized, without it becoming overwhelming, and feeling a quick, swift sense of easy-peasy accomplishment.
Now...you have our permission go go and heat up something yummy for dinner! Mmmm.

Spring Cleaning Start: Weekend Three!
Dude! We are almost there! And this one is fun, because this weekend, we are going to focus upon..
Spring Cleaning the Kitchen!
Dude! We are almost there! And this one is fun (sort of!) because this weekend, we are going to focus upon...
Spring Cleaning the Kitchen!
Okay, let's get some easy-breezy materials together:
Your fave natural cleanser (or white vinegar) that you can clean all surfaces and glass with, too.
Bon Ami Cleanser
Rags
Magic Erasers (a few!)
Baking Soda
Newspapers or paper towels for the glass and windows
Mop and whatever natural floor cleaner you use (I use the same spray for everything)
Ready? Let's GO:
Look at everything in your pantry. Take a breath. Now, go through it! (If you have kids old enough to read a label, promise them a really nice treat, and have them help you go through, tossing anything old and expired and past its prime.
Take OUT all the goods in the pantry you are keeping! Then, wipe down with cleanser the entire cabinet(s) shelves or pantry room. (ALL of the shelves. up and down!)
Put all of the pantry goods, jars, and cans of food back in the pantry.
Mix about a cup of Baking Soda and 1/4 cup of warm water and make a paste (adding more water when necessary.) Open the oven, and scrape out the bits with a butter knife you can get at. The dried, gunky bits you can't? Put the baking soda paste over it, and spread it throughout the oven where you see those "burnt" streaks. Close the oven, leave the mixture on inside overnight. (This method works like an incredible charm-I swear!)
Take the Bon Ami and natural cleanser, and carefully clean the top of the stove, getting at all of the gunky stuff, if it's there! Finish off with the cleanser, making it really sparkly and shiny. (Clean the "window" on the oven, if you have one, too!)
Next, take and dampen your Magic Eraser, and let's hit the kitchen sinks! This is the most oft-overlooked place in the kitchen to really clean. If you have a disposable, run it, and toss a quarter of a lemon in there, to make it smell nice. Take that eraser, and really clean the kitchen drains, which, you will see, are really dirtier than you think, I assure you. Rinse with more cleanser and Bon Ami and rinse again, all of it! I guarantee it, your kitchen will instantly just look and "feel" cleaner.
Take everything out of your fridge, and we mean-EVERYTHING. Toss what is disgusting, old, out-of-date, you get it! (Make a little spot on the kitchen counter for veggies you can save, and use for some nice meals this weekend, if at all possible.
Fill your now spotless sink with warm, sudsy waters and put in the plastic produce drawers, if yours pull out.
Now get in that fridge, and wipe that baby down! (STOP whining about what a mess your fridge is-we are almost done, here!) Make sure to get at the disgusting parts on ten shelves and in the grooves-(just do it! :)
Make a list off condiments and things to get and place at the store.
Wipe down the food and jars and things you are keeping in fridge. Do the freezer next, same deal!
Take your Magic Eraser, take everything off the top of the fridge, if anything'e store up there, and clean off any dust and grim duo there. Also- whet the hell do you have up there, anyway? If it's not cute or functional or decorative, take it outta there! (That cabinet above the stove is usually great for storing store bits of kitchen ephemera you don't want to part with.)
Hopefully, you have already hit under the Kitchen Sink. If not, read THIS!
Okay! YOU ARE AMAZING! Now, last but not leastly, it is time to do the floors.
Sweep or vacuum up the kitchen floor.
Whatever your favorite method of mopping is, utilize it now, but get in there! Around teh stove and fridge, especially. Wipe down the baseboards! You heard us, just do it! Us ether Magic Eraser for this, it's super-healpful on grimy dust.
Go throw your drawer of kitchen linens, and turn into rags anything that looks ratty or too old and not fun to use.
In the morning, wipe out the oven. You will be amazed at how much easier the baking soda mixture make this.
Clean off the top of the stove hood with a Magic Eraser and rag.
Go & get yourself one or two pretty, new dishtowels or some nice, new cloth napkins…:)
And...you are DONE! GOOD JOB!


Tiny Tidy: Inside the Trunk of Your Car...
Okay, we realize that this may not apply to everyone, not by a long shot. Some have spotless car trucks, many don't care about this anyway, and some live in fantastic urban cities that do not require the ownership of automobiles (lucky ducks!). SO! If you docare, and if you spend an inordinate amount of time in your car like I do, living is Los Angeles, this little Tiny Tidy is for you. So, here we go!

Okay, we realize that this may not apply to everyone, not by a long shot. Some have spotless car trunks, many don't care about this anyway, and some live in fantastic urban cities that do not require the ownership of automobiles (lucky ducks!). SO! If you do care, and if you spend an inordinate amount of time in your car like I do, living is Los Angeles, this little Tiny Tidy is for you. So, here we go!
- Pick a safe time of the day to do this, if you have to park outside, or in carport, thats' relatively "quiet." If you have a garage, lucky you. you can do this at 2 am, if you wish!
- Put a few garbage bags or old blanket on the ground.
- Take everything OUT of the trunk. (Believe me, this is painful for me too, I feel ya.)
- Put everything from the inside the trunk into your living room, and put it back in its proper place. Maybe it's old clothes and shoes meant to be donated? That stuff goes in your front seat, to be taken to the Goodwill or drop-off bin stat. Are there a few boxes of left over Christmas things to be returned? Work supplies? What? (If you need to put it back in the trunk because some stuff you actually use daily or weekly, that's okay, we'll do that next)
- Depending on whether or not you have a Dustbuster, vacuum up the trunk or, are feeling quite vigorous and sans personal, hand-held vacuum, take the car to a instant car wash place and vacuum out the trunk there.
- Drop off anything that needs to be donated on the way there or back. (DO IT! :)
- Go back to the living room. Now, what really needs to be in that trunk? Ideally, we are just talking about things like emergency kits, water, extra reusable shopping bags, and maybe some postage supplies, PLUS- whatever you do need for work or life (supplies and sports equipment, sports, kids etc.) Decide. Be ruthless!
- Organize this stuff now. Just go ahead and do it, it will take fifteen minutes, tops, I promise. Hopefully, you have stashed away, recycled or donated the excess stuff that was being hoarded there.
- If you are so inclined, and definitely do have stuff that NEEDS to stay in the trunk of your car, grab ONE small bin, or a few pretty, square baskets that you wouldn't mind utilizing.
- Bring everything back to the car's trunk outside (or in garage) along with the baskets or bin, and start to organize. Do it fast- please do NOT overthink it. This is not a Martha Stewart marathon. Just a good, old fashioned tiny Tidy to make your commutes more pleasant and enjoyable.
Enjoy the strange, refreshed and buoyant feeling you experience next time yo get into your car. You are a badass.
You have a clean car trunk, woo-hoo! xo
You can purchase this nifty Black & Decker hand-held vacuum at Target, click below:

Spring Cleaning Start: Weekend Two!
We are on to Weekend #2 of our Spring Clean Guide. How was last week for you? Was it too much, or not quite enough? Please, do let us know below! Now, we are going to kick off this weekend with a few "big" tasks, sprinkled in with some truly smaller, more "fun" ones. Okay, ready or not! Here we go...(And again, please feel free to start Friday night, if you wish!)
We are on to Weekend #2 of our Spring Clean Guide. How was last week for you? Too much, or not quite enough? Well...
Now, we are going to kick off this weekend with a few "big" tasks, sprinkled in with some truly smaller, more "fun" ones. Okay, ready or not! Here we go...(And again, please feel free to start Friday night, if you wish)
Weekend #2 of the Spring Clean Start:
This weekend, we are going to focus on two BIG things: The walls, and the bathroom!
(I know.)
Now that you hopefully lightly dusted and de-cobwebbed your walls last weekend, grab a magic eraser, dampen it, and go around rubbing out any scuffs or little marks that you can manage from your walls.
Get a chair ready, take a rag or micro-fiber cloth, spritz on your fave natural cleanser, and get to work! Start at the top, and work your way down. Remember the endless moves he had to do in The Karate Kid? Just go in sweeping motions, like you are waxing or drying off your car.
Next, take care of any spots or true wall marks that cannot be buffed out. I keep a bright white tube of acrylic paint in a drawer, and daub any "real" marks.
Take a little break. Go for a walk. Meet a friend or take your partner out for lunch or coffee. Deal with your kids, and tell them you need a little "me" time. (Or ask your kids to help!) Just take a little rest!
Next, we are going to tackle your bathroom(s)! Ugh. I know. It is my least favorite room to clean, by far. So, to make it FUN...
We are going to make "Doo" Drops! I'm dead serious. And NO, I confess, I am not really a DIY person, but these drops are so fun, silly, and easy to make that it seems silly not to do this when cleaning out the dreaded bathroom! Just take a small glass or plastic bottle (preferably one that has a dropper, but that is not necessary) and pour about 2:1 in parts (depending on the size of your bottle) cheap vodka or rubbing alcohol/ to liquid hand or dish soap. Then, add about five drops of your fave essential oil, shake that baby up, et voila, instant "DO before you DOO!" Drops! (The bright idea is that you or a guest shake out a few drops into the toilet before they go number deux. The oil makes a coating on top of the water that traps odors.) Trust me, It's genius, and it WORKS! You can even grab a colorful marker, but off some brown paper from a grocery bag, and make a cute label. Done! (You are now a DIY genius.)
Next! Here we go: Take out everything on the sides of the tub, top of sink and vanity, and around and in the shower. That would be the shampoo and conditioner bottles, soaps, bubble bath and salts- you name it. Just put it in the hallway for now, even. What we want is a clean surface so we can get in and out of there, as easy and fast and possible. Remove everything from the top and around your toilet, as well.
Start with the toilet, in fact. I prefer using Bon Ami powder, which is a safe, gentle-yet-abrasive cleanser, which is also very inexpensive. Oxi Clean packets are also great to toss in and let dissolve, and they smell divine. Next, get out your toilet brush and scrub away! Take a rag and your fave natural cleanser, and scrub the top and sides of the toilet. GENIUS TIP: Take one or two DENTURE CLEANSING tablets as a safer alternative to those nasty blue pods. (Yes!) Grab some cheap ones at the Dollar Store. I'm serious! They leave a nice fizz, actually safely clean porcelan, and give a nice finish.
Your tub/shower: Bon Ami your tub, after first rinsing it with warm water from the shower, and pull up any stray grossness with a rag or paper towel. Spray and wipe the tile and surrounding walls.
Wipe down the sides and "walls" of the tub, as well, down to the floor.
Finish off the tub with a white vinegar/warm water rinse, to de-germ for real. (You can also add a few drop of your fave essential oil to the vinegar mix, if you'd like.)
Clean the mirrors, sink and vanity.
Wipe down all of the shampoo and shower gel bottles, skin care, whatever was resting around the tub and vanity, and put it all back.
Fun job: Run down to the drug store and buy a sack of scented Epsom salts, (lavender or eucalyptus!) and decant them in a pretty jar, popping it next to your tub. Super inexpensive, and a pretty little treat for you and your tub.
Run some hot water, and take a nice, long bath! You deserve it!!!
Have a great rest of your weekend...! xo
Tiny Tidy: Your (ahem!) Nightstand Drawer
Today, we will be cleaning out our nightstand drawer(s)! We don't mean to be cheeky. But whether you store some saucy stuff in there, or not, it is completely refreshing to do this, especially if, like us, you love to lounge, eat, read, work and do tons of other fun things in bed...OKAY! Here we go...
Today, we will be cleaning out our nightstand drawer(s)! We don't mean to be cheeky. But whether you store some saucy stuff in there, or not, it is completely refreshing to do this, especially if, like us, you love to lounge, eat, read, work and do tons of other fun things in bed...OKAY! Here we go:
Open each bedside, night table drawer, one by one. How do you feel? Are you anxious? Do you have a few journals in there you started, but never finished? Does something in there remind you of the sex you are currently having or not having (and both thoughts fill you with dread?) Take note! We are going to fix a few things, here.
Find a cloth bag or large, pretty make-up bag you can repurpose. Put all of your sexy time USA stuff in here. (Note to Self: Those satiny Sephora gift bags, which they give out free over the holiday with any purchase, are perfect for this!)
If you have no sexy stuff to chicly store, than use this bag for any daily meds, headphones, body cream you have. Just capture anything you may use nightly (or morningly) in this pretty bag.
Take everything out of the drawer, one drawer at a time. Still anxious? That's right. It's because you won't read those books that have been hiding in there! So, go file them back on the bookshelf. #feelnoguilt. Now, this is not about the PILE of books on nightstand you're currently reading. That is a totally different story!
I know this will really bother some people, but please recycle any old journals stored here, (even with a few blank pages left) that cause you to feel any amount of psychic pain. Trust me, this is an AWESOME way to make way for the new. If you had a crappy few months, or year, and were sort of trying to journal your way through it, recycle those babies (Unless there was anything remotely creative in there you may need for a future project). Please. I promise! It's really okay.
Take TEN MINUTES ONLY to put things in other places-bits of jewelry, workout clothes, your ten pens, lingerie, etc. Don't get stuck here!
Old letters, momentos, concert stubs, birthday cards? Put them in a file for a now and store on or in a desk or cabinet. We will be dealing with those things later on this month.
Find a pretty, deep bowl, and place it INSIDE the top drawer. Put your hand and body cream or essential oil in here, ONE pen, and a NEW journal or notebook (if you use one) here.
Add a few "lucky charms" or crystals to the bowl, for fun, if you wish!
Anything else-try to store in your closet or bookshelves, if you can...
Remember, we are NOT aiming for Pinterest perfection, here. Just whatever is soothing, and feels right, to you. Here's mine:

AND...you're DONE! YAYAYAYAY! xo
Join us weekly as we tackle what's weighing us down, lifting us up, and getting us moving-both at home and in the every day...
Where you come home from a long, hard day, there is GREAT temptation to just toss your stuff any old place, crack open a bottle of wine and put your feet up…But what if you could get to the fun part after you quickly get organized for the next day? That’s what a perfectly functioning Landing Strip in your home should do for you (and your family): Get you good & ready for the next day’s activities/work. So! With those thoughts in mind, let’s get to it…!